Bulk Repair Album Artwork on Windows

Sunday, 15. September 2019

It’s the worst! For years nearly every album on my computer has had Justin Timberlake’s album artwork. This has polluted my media experience ever since I discovered just ONE SONG I liked by JT.

I had tried removing all .jpg files. I had tried deleting all desktop.ini files. NOTHING!

I decided to actually fix the problem and do a little research.

Here’s my find:

This is in two sections, deleting Window’s Media Player’s bad thumbnails, and removing MP3 tag thumbnails (which are in the MP3 file itself). This will likely not fix WAV, WMA, or FLAC thumbnail issues. You likely can go ahead and just fix the MP3 tag issues and most of your thumbnails will be corrected, but I suggest performing the first step since if you, like me, back up, restore, and move around your music; you likely have tons of thumbnail files hiding around. Skip to part 2, which is way simple, if you don’t think this applies to you or if you don’t care about lugging around extra datums.

Pre-flight check: Back up your music. I won’t be listening to your sorry ass complain in the comments that you lost something.

Close your media programs while you do this so it isn’t busy trying to add artwork back as you modify your music. You should also know that there is a possibility that some artwork just won’t get added back depending on how accurate your MP3 Tag data is.

PART 1

First, go ahead and delete Window’s created artwork files. You’ll need to open your main music folder in Windows Explorer. (Quick hint: just hit the Windows + E keys to open Explorer).

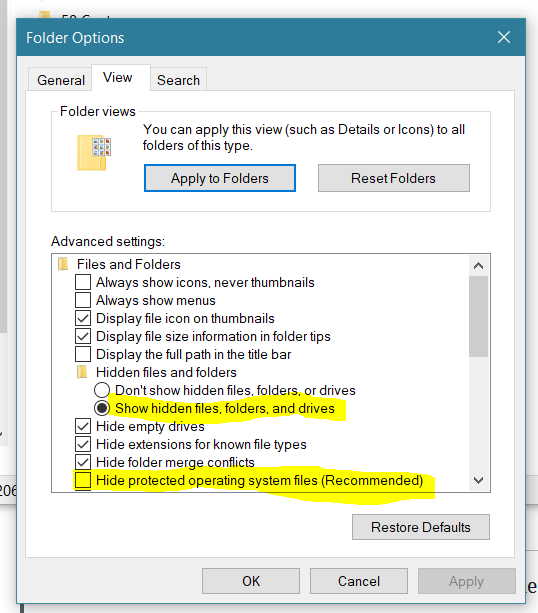
Second, you’ll need to enable hidden and system files. Come back to this step later to hide those files again. In the explorer, click “View” in the toolbar, and then “Options.” Click the options to show hidden files and uncheck the option to hide system files.

Windows Folder Options

In your music folder, use the search box to search for “.jpg” (type it in and press ENTER.)

After the search function finishes, you will see all JPG files that were in your music folder. Do not attempt to continue with any folders that have a mix of music and documents, you should only delete these files if they are in a dedicated music folder.

In the search results, press CTRL+A to select all, and press delete.


PART 2

Right, so now you’ve deleted all thumbnail information placed by Windows/Media Player. Now we just need to remove thumbnails from your MP3 tags, which are in the MP3 files themselves. No worries, there exists free software for this!

Visit www.taghycardia.info and download Taghycardia. Taghycardia is a MP3 tag management program (and once again, the free version only works for MP3 files).

I prefer standalone versions of software like this. Go ahead and download and extract the software.

Drag the music folder you want to manipulate into Taghycardia. Follow the instructions to remove album art. There, that was simple!

Open Windows Media Player or Groove Music, or iTunes or whatever you use. These programs will download artwork data for you.

Other stuff

Taghycardia is great for fixing other MP3 tag issues. It isn’t flawless software, but it’ll guide you through fixing all sorts of MP3 tag issues. Plus, it doesn’t have an exit button once it gets going, so it kind of forces you to sit down and hash it out. That’s a feature, not a flaw :P

Windows XP Service Packs, post support

Thursday, 17. July 2014

If you need to download the Windows XP service packs (SP1, SP2, SP3) now that the XP support date has ended, you can still download them from Microsoft. Links to each are on this page:
http://windows.microsoft.com/en-us/windows/service-packs-download#sptabs=xp

XP SP1:
http://www.microsoft.com/en-us/download/details.aspx?id=19751

XP SP2:
http://www.microsoft.com/en-us/download/details.aspx?id=28

XP SP3:
http://www.microsoft.com/en-us/download/details.aspx?id=24

Where to download Windows XP SP 1, 2, and 3

Wednesday, 8. August 2012

Question: Where can I download all the Windows XP Service Packs?

Description: Microsoft does not have a easily located singular location to download SP1, SP2, and SP3.

Answer:
You can check out the Windows Service Pack Center:
http://windows.microsoft.com/en-US/windows/downloads/service-packs
Which has all updates listed for Windows XP, Vista, and 7.

Or, you can download from the individual Microsoft Download Center locations:

SP1: (Sp1a Express) http://www.microsoft.com/en-us/download/details.aspx?id=19751

SP2: http://www.microsoft.com/en-us/download/details.aspx?id=28

SP3: http://www.microsoft.com/en-us/download/details.aspx?id=24

Keep in mind, download Service Packs manually will be much larger than installing them via. Windows Update

Need the 64 bit version?
SP1 x64: There is no SP1 for XP 64 bit. This is because XP 64 was based on the Windows Server 2003 SP1 codebase (essentially, it already has SP1 in it).
SP2 x64: http://www.microsoft.com/en-us/download/details.aspx?id=17791
SP3 x64: http://www.microsoft.com/en-us/download/details.aspx?id=17791

Did this help you? Comment and let us know!

Enhanced by Zemanta

How to Create a Bootable Windows 7 Installer USB Drive

Thursday, 30. June 2011

I finally found a good guide to create a Windows 7 Bootable USB Drive. It is definitely the best on the internet, and has instructions for creating within XP, Vista, and Windows 7.

Visit it here: http://maketecheasier.com/boot-and-install-windows-7-from-usb-flash-drive/2009/01/23

Enhanced by Zemanta

How to get mouse out of a DOS Box

Sunday, 26. June 2011

Problem: A DOS program running in DOSBox used the mouse, and now you can no longer get the mouse of the DOSBox.

Solution: Press CTRL+F10

If that does not work, press the Windows key on your keyboard.

Enhanced by Zemanta

Windows: Retrieve your Windows key offline

Monday, 30. May 2011

Question: How can I retrieve my Windows key when I can not access my computer? (How can I retrieve my Windows key offline) (How can I retrieve my Windows key with a Linux Disk)

Answer:
First, there is no good way to do this using a Ubuntu or Linux Live disc. Sorry.
But, there is an easy way to do this.

Note: Most computers have the key on them somewhere in the form of a sticker. Make sure that the sticker Windows version matches the version installed on the computer to avoid upgrade confusion. If this sticker is missing, proceed using the key.

You can use Hirens Boot CD to retrieve your Windows Keys offline. Hirens Boot CD has MiniXP on it, which is how we will address retrieving your key.

You can download Hirens Boot CD here. For more information of what software is on the CD, click here. For instructions on how to make a bootable USB for Hirens Boot CD, click here (medium difficulty) .

Instructions:

(Ease: Medium. 3/10 difficulty.
Download and burn the newest version of Hirens Boot CD (in our case, it was version 14.0). Download link is above.

Upon booting of the CD, select the option to boot into “Mini Windows Xp”. This will take a moment to load, especially from the CD.

From the MiniXP Desktop, double-click the “HBCD Menu” shortcut.

Select, from the menubar, Programs > Passwords / Keys > Product Keys >
Select XP Key Reader for reading XP Keys, or ProduKey for others.

For XP  Key Reader:
On the XP Key Reader window, click “Browse” and select the drive with your Windows installation, and select the Windows folder.
Then, on the main program window, click “Read Remote Key”

For ProduKey:
When you open ProduKey, a Window will appear. Choose “Load the product keys from the external Windows directory” and click “Browse”.
Select the drive with your Windows installation, and select the Windows folder.
Click OK at the bottom of the source window. (Tip: If your screen is small, you may not be able to see the OK button. Simply press ENTER.)

Wait a moment, and the keys will load.


Tip: Write your keys down twice. If you write the key down wrong by accident and reformat, you may be out of luck for getting the key back again.

The Sims 3: Objects, Sims, and Lots Turning Black (Windows, Linux & Wine || PlayOnLinux)

Sunday, 19. December 2010

Target: This article applies to both users running The Sims 3 (all or no EP’s) on either Windows, or WINE (or PlayOnLinux).

This article covers the description of the problem, causes, how to clear the Sims 3 Cache, and how to resolve the problem completely.

Problem description: Objects, Sims (especially clothing) and all or parts of lots are turning black. (Anything with texture).

Further: … Sometimes only newly placed objects have these issues occur. Some Sims may still have correct clothing while others do not. Certain categories of objects (such as only floors, only walls, only tables) seem to have this problem.
Cause: The cause is not certain, but it has been narrowed down to a few things:

Your Graphics Card does not support Vertex Shading. Try disabling “Advanced Rendering” in the Sims 3 options window. Try clearing the cache (see below for instructions)

DirectX may be out of date (Windows) or not all components of DirectX are working properly (WINE + Linux)

Problem Solution:

1. First, please try simply clearing the Sims 3 cache. To do this, Navigate to where your Sims files are saved. This should be located under your My Documents folder (or the Home Folder, in Linux) and under the sub folder, Electronic Arts > The Sims 3

Delete every file (not folder) that contains the word Cache. These should be:

CASPartCache.package

compositorCache.package

scriptCache.package

simCompositorCache.package

Also delete all files in the “Thumbnails” folder.

(“What is a Cache?” see note 1)

Note about deletion: Keep these files in your Recycle Bin, or even consider backing them up first in case the problem gets worse. In the case that it does get worse, you should consider reinstalling your game.

After you have deleted the cache, start the game again and see if this resolves the problem.

If it does fix the problem, restart the game to make sure that the solution lasts.

If this does not fix the problem, continue:

2. Disable “advanced rendering” in the game’s graphics options menu.

Delete the cache again (step 1).

Start the game. If this does fix the problem, restart the game to make sure that the solution lasts.

3. If the problem is still occurring, lower the texture detail in the game to its’ lowest setting.

Delete the cache again (step 1)

Start the game. If this does fix the problem, restart the game the game to make sure that the solution lasts.

4. If the problem is still occurring, lower all other graphics settings to their lowest setting.

Delete the cache again (step 1)

You can either leave these settings on low, or try upping them until you get the problem again and narrow them down to a setting that works.

If this helped you solve the problem, please comment below and let people know what you tried and what was or wasn’t helpful, as well as any other solutions you may have found.

Note 1:

“What is a Cache?”

A cache is a place where a program or operating system stores information to be used again. Caches often contain old information that is no longer needed. Caches can also be used to conserve space in the RAM of your computer by storing less used information on the hard drive. A cache often contains instruction sets that the computer has performed in the past, so that the computer will not have to recalculate certain things in the future.

Or, as Wikipedia says:

In computer science, a cache is a component that improves performance by transparently storing data such that future requests for that data can be served faster. …

en.wikipedia.org/wiki/Cache